Changchun Master Li

[RPi bring up] openocd用树莓派1调试树莓派5

2025-02-01

之前写过一篇文章,介绍如何用 SEGGER J-Link V9 调试树莓派

使用jtag和gdb实时调试Linux内核

从树莓派3起,开始上aarch64架构的 CPU 核心了,3代、4代、5代树莓派分别是a53、a72、a76。对于64bit的aarch64,J-Link V9 变得无能为力了,只得花大价钱购买 J-Link V12,最终还可能导致家里积攒了一堆扔掉可惜但又没什么用的 debugger。

openocd是调试树莓派5的最佳选择

openocd简介

openocd是开源的系统的调试工具。它支持多种硬件调试接口,如 JTAGSWD,支持多种 debugger adapter 和 target 。一般来说,openocd 硬件方面会搭配 cmsis-dap (比如Picoprobe) 或者 ft2232h 来使用,但如果这些硬件你都没有,老旧的树莓派也可以被支持做为 debugger adapter (事实上,任何支持GPIO的嵌入式SBC都可以作为openocd的debugger来用)。我这里使用的是 raspberry pi 1 model A。

debugger侧配置

首先给树莓派刷入 Raspberry Pi OS Lite ,选择最新的 32bit debian12 即可,这里不再赘述。

使用最新的 openocd官方最新版本 编译、安装

1
2
3
4
5
6
git clone git://git.code.sf.net/p/openocd/code openocd
cd openocd
./bootstrap with-submodules
./configure --enable-bcm2835gpio --prefix=path/to/openocd_install_path --enable-internal-jimtcl
make
make install

安装好软件后,我们需要连一下 raspberry pi 1a 和 raspberry pi 5

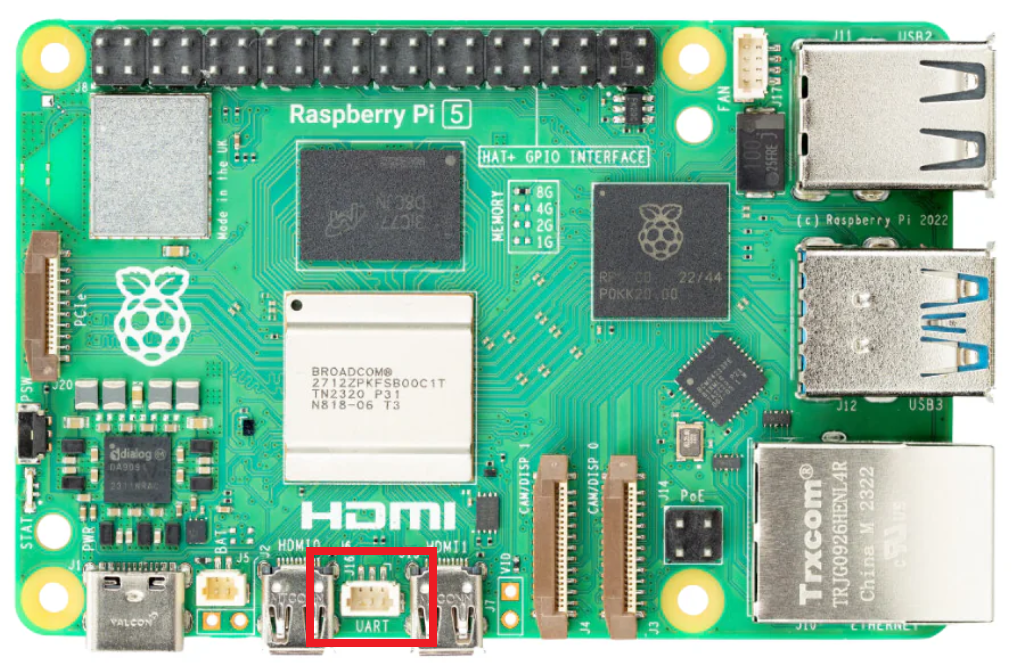
raspberry pi 5 仅支持 SWD 接口,位于 UART 接口 (默认为 UART,可以配置为 SWD) 可以从某宝上购买 JST SH 1.0 mm 3pin 的转接线转到标准 2.54mm 间距的杜邦线。从左往右依次为

io、gnd、clk

rpi5 swd

在 share/openocd/scripts/interface/raspberrypi-gpio-connector.cfg 就可以看到debugger pin的配置

1
2
3
4
# Each of the SWD lines need a gpio number set: swclk swdio
# Header pin numbers: 23 24
adapter gpio swclk -chip $_GPIO_CHIP 11
adapter gpio swdio -chip $_GPIO_CHIP 8

JTAG at Raspberry Pi GPIO Pinout

GPIO11 和 GPIO8 对应树莓派1的23、24pin,分别是 clk 和 io

连接好硬件后,修改 share/openocd/scripts/interface/raspberrypi-native.cfg 加入bindto,可以listen局域网内的请求

1
bindto 0.0.0.0

接下来,我们需要增加 raspberry pi 5 的 openocd target 配置, RaspberryPi5Debugging 上有一个从rpi4修改而来的配置,直接拿来保持成 rpi5b.cfg 文件备用。

1
2
3
4
5
6
7
8
9
10
11
12
13
14
15
16
17
18
19
20
21
22
23
24
25
26
27
28
29
30
31
32
33
34
35
36
37
38
39
40
41
42
43
44
45
46
47
48
49
50
51
52
53
54
55
56
57
58
59
60
61
62
63
64
65
66
# SPDX-License-Identifier: GPL-2.0-or-later

# The Broadcom BCM2712 used in Raspberry Pi 5
# No documentation was found on Broadcom website

# Partial information is available in Raspberry Pi website:
# https://www.raspberrypi.com/documentation/computers/processors.html#bcm2712

# v1.0 initial revision - trejan on forums.raspberrypi.com

if { [info exists CHIPNAME] } {
set _CHIPNAME $CHIPNAME
} else {
set _CHIPNAME bcm2712
}

if { [info exists CHIPCORES] } {
set _cores $CHIPCORES
} else {
set _cores 4
}

if { [info exists USE_SMP] } {
set _USE_SMP $USE_SMP
} else {
set _USE_SMP 0
}

if { [info exists DAP_TAPID] } {
set _DAP_TAPID $DAP_TAPID
} else {
set _DAP_TAPID 0x4ba00477
}

transport select swd

swd newdap $_CHIPNAME cpu -expected-id $_DAP_TAPID -irlen 4
adapter speed 4000

dap create $_CHIPNAME.dap -chain-position $_CHIPNAME.cpu

# MEM-AP for direct access
target create $_CHIPNAME.ap mem_ap -dap $_CHIPNAME.dap -ap-num 0

# these addresses are obtained from the ROM table via 'dap info 0' command
set _DBGBASE {0x80010000 0x80110000 0x80210000 0x80310000}
set _CTIBASE {0x80020000 0x80120000 0x80220000 0x80320000}

set _smp_command "target smp"

for { set _core 0 } { $_core < $_cores } { incr _core } {
set _CTINAME $_CHIPNAME.cti$_core
set _TARGETNAME $_CHIPNAME.cpu$_core

cti create $_CTINAME -dap $_CHIPNAME.dap -ap-num 0 -baseaddr [lindex $_CTIBASE $_core]
target create $_TARGETNAME aarch64 -dap $_CHIPNAME.dap -ap-num 0 -dbgbase [lindex $_DBGBASE $_core] -cti $_CTINAME

set _smp_command "$_smp_command $_TARGETNAME"
}

if {$_USE_SMP} {
eval $_smp_command
}

# default target is cpu0
targets $_CHIPNAME.cpu0

target侧配置

首先给 raspberry pi 5 刷入 Raspberry Pi OS 64bit deiban12,raspberry pi 5 需要定制一些额外的配置,给 /boot/firmware/config.txt 加入下面两行

1
2
dtparam=uart0_console  # Move the kernel boot console to UART0
enable_jtag_gpio=1 # enable gpio function jtag

https://github.com/raspberrypi/firmware/blob/master/boot/overlays/README

target 侧配置好之后,重启系统,启动openocd

1
2
3
4
5
6
7
8
9
10
11
12
13
14
15
16
17
18
19
20
21
22
23
24
25
26
27
28
29
$ ./bin/openocd -f interface/raspberrypi-native.cfg -f target/rpi5b.cfg
Open On-Chip Debugger 0.12.0+dev-00850-gd09f53a93-dirty (2025-02-12-18:25)
Licensed under GNU GPL v2
For bug reports, read
http://openocd.org/doc/doxygen/bugs.html
Warn : TMS/SWDIO moved to GPIO 8 (pin 24). Check the wiring please!
Info : Listening on port 6666 for tcl connections
Info : Listening on port 4444 for telnet connections
Info : BCM2835 GPIO JTAG/SWD bitbang driver
Info : clock speed 3646 kHz
Info : SWD DPIDR 0x2ba01477
Info : [bcm2712.ap] Examination succeed
Info : bcm2712.cpu0: hardware has 6 breakpoints, 4 watchpoints
Info : [bcm2712.cpu0] Examination succeed
Info : bcm2712.cpu1: hardware has 6 breakpoints, 4 watchpoints
Info : [bcm2712.cpu1] Examination succeed
Info : bcm2712.cpu2: hardware has 6 breakpoints, 4 watchpoints
Info : [bcm2712.cpu2] Examination succeed
Info : bcm2712.cpu3: hardware has 6 breakpoints, 4 watchpoints
Info : [bcm2712.cpu3] Examination succeed
Info : [bcm2712.ap] gdb port disabled
Info : [bcm2712.cpu0] starting gdb server on 3333
Info : Listening on port 3333 for gdb connections
Info : [bcm2712.cpu1] starting gdb server on 3334
Info : Listening on port 3334 for gdb connections
Info : [bcm2712.cpu2] starting gdb server on 3335
Info : Listening on port 3335 for gdb connections
Info : [bcm2712.cpu3] starting gdb server on 3336
Info : Listening on port 3336 for gdb connections

然后用 gdb 连接到某一个核心上

1
gdb vmlinux -ex "set architecture aarch64" -ex "target remote 192.168.1.x:3334"

用 taskset 命令可以轻松指定程序运行在特定核心上,也可以用内核参数maxcpus=1限制启用的核心,这样就可以方便的调试树莓派5了

issue

gdb break 命令给树莓派5设置断点会导致系统没有响应,可以用hardware breakpoint来绕过

reference

OpenOCD + GDB 调试
Raspberry Pi 5 JTAG configuration
Debugging on Raspberry Pi 4 and 5

使用支付宝打赏
使用微信打赏

若你觉得我的文章对你有帮助,欢迎点击上方按钮对我打赏

扫描二维码,分享此文章